When I first started building my home espresso setup, I wanted something fast, consistent, and beginner‑friendly without spending thousands.
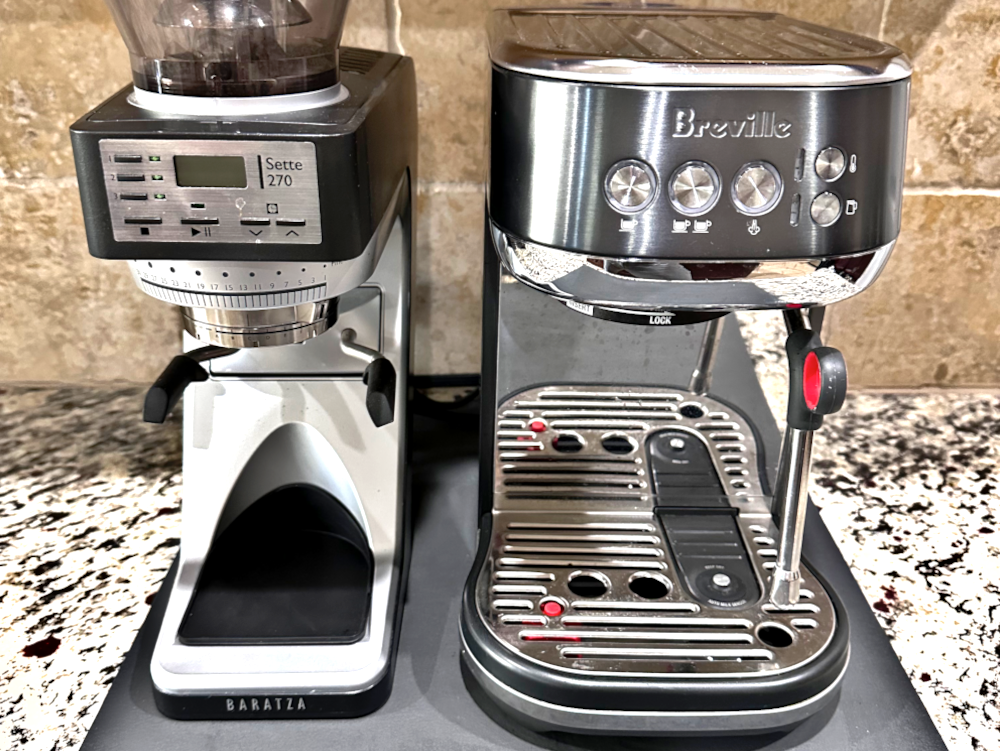
After researching and testing different machines and grinders, the Breville (Sage in the UK/EU) Bambino Plus paired with the Sette 270 became the combo I’ve used every single day for the past year. I did consider the Gaggia Classic, but the Bambino’s more automated features made it the better fit—especially since my wife prefers a simple, no‑fuss workflow. If you would like to see a breakdown on why I chose this esporesso machine/grinder check out this article: Why I Chose the Bambino Plus and Baratza Sette 270 (And how I feel about them today)
In this post, I’ll break down exactly what you need, and whether this setup makes sense for your home espresso journey.
TL;DR – The Short Version
- The Breville Bambino Plus is an excellent entry-level espresso machine if you want speed, consistency, and a small footprint
- A good grinder matters more than the machine—don’t cheap out here
- You only need a grinder, tamper, scale, and milk pitcher to make great espresso
- Accessories like a bottomless portafilter, WDT, and puck screen help—but aren’t mandatory
- This setup is ideal for beginners who want good espresso without turning it into a second job
Affiliate Disclosure
This post contains affiliate links. If you use them, I may earn a small commission (at no extra cost to you). This helps support the site, and I only recommend gear I actually use or would buy myself.
Key Considerations When Choosing a Home Espresso Setup
Before buying anything, it helps to be honest about what you want out of espresso at home. Consider:
- How much counter space you’re willing to dedicate
- How much time you want to spend dialing in shots
- Grinder quality and consistency
- Budget and long-term upgrade paths
- Whether you primarily drink milk drinks or straight espresso
- How hands-on vs automated you want the workflow to be
- Whether you’ll grind beans for other methods (drip, cold brew, French press, etc.)
Your answers here matter more than brand loyalty.
Why I Love the Breville Bambino Plus and Believe it’s a Great Entry-Level Machine
The Bambino Plus nails the fundamentals without overcomplicating things.
What stands out:
- Fast heat‑up (ready in seconds)
- Compact footprint for small kitchens
- Consistent, repeatable shots
- Auto‑steam for easy milk drinks
- No required plumbing
If you want café-quality espresso at home without committing to a full prosumer workflow, this machine punches well above its price.
Required Items for your Home Espresso Setup
There are a lot of espresso accessories out there. Most are optional. Below is the irreducible minimum required to consistently make good espresso.
Grinder (The Most Important Piece)
A capable espresso grinder is arguably more important than the espresso machine itself.
Pre-ground coffee, especially grocery store coffee, limits your ability to dial in shots and goes stale quickly. If you’re not interested in grinding fresh beans, espresso will always be an uphill battle.
Grinders fall into two main categories: manual (hand) and automatic (electric). I personally use and enjoy the Baratza Sette 270. See my review here if interested: Baratza Sette 270 Review (2026): Pros, Cons & Is It Still Worth It for Espresso?
Hand Grinders
Hand grinders have improved dramatically over the past decade and are a legitimate option for espresso.
Pros
- Lower cost (great entry point; ~$60+)
- Excellent grind quality for the price
- Quiet—no waking the house at 6 a.m.
- Portable (travel, camping, office)
Low retention, great for single dosing - Simple maintenance
Cons
- Manual effort required (espresso grinding can be tiring)
- Slower workflow (35–45 seconds for ~18g)
Not ideal for multiple daily drinks - Some models struggle with ultra-fine adjustments
Automatic
This is what most people picture when they think “coffee grinder.” They are motorized and will do the work for you.
Pros
- Fast and effortless (8–12 seconds for 18g)
- More precise micro-adjustments
- Better for frequent espresso brewing
- Ideal for households or entertaining
- Stable RPM and particle consistency
Cons
- More expensive (espresso-capable models ~$200+)
- Louder
- Larger counter footprint
- More parts that can fail
- Higher retention on some models
Tamper
You can’t prep a puck without a tamper.
The stock Bambino Plus tamper works, but it’s lightweight, plastic, and not very ergonomic. If your budget allows, a spring-loaded tamper is one of the best early upgrades for consistency and comfort. That said, a cheap tamper can still produce great espresso if your technique is solid.
Scales
A scale is not optional if you want consistent espresso. You’re controlling inputs (dose) and outputs (yield), and a good scale turns guesswork into repeatable results.
What to look for:
- 0.1g accuracy
- Fast response (<300ms)
- Small footprint (fits on the Bambino drip tray)
- Water-resistant design
- Built-in timer (optional but very useful)
Typical cost ranges:
- Budget: $20–$40
- Mid-range (best value): $50–$100
- Premium: $150–$250
Timers
Shot time is a key variable when dialing in espresso. Many scales include a timer, but you can also use your phone or a separate timer. No need to overthink this.
Milk Pitcher
If you plan to steam milk, you’ll need a pitcher. The Bambino Plus includes a perfectly usable one.
If you want to improve latte art, upgrading to a pitcher with a narrower spout can help, but it won’t noticeably change flavor.
Optional Upgrades for your Bambino Setup
Dosing Funnel
A dosing funnel keeps grounds from spilling during puck prep. I highly recommend one—preferably a magnetic model that locks onto the portafilter. I’ve knocked non-magnetic funnels off more than once and paid for it with a counter full of coffee. I highly recommend this!
Bottomless Portafilter
This is a useful, but sometimes frustrating, upgrades. A bottomless portafilter lets you see extraction issues like channeling, spraying, or uneven flow. That visual feedback is invaluable when dialing in.
| Puck Issue | What You’ll See in the Shot |
|---|---|
| Old beans | Minimal crema |
| Grind too fine | slow drips, choking |
| Grind too coarse | fast, thin streams |
| Uneven puck prep/channeling | spraying or multiple streams |
| Under‑tamping | messy, uneven flow |
The downside? When things go wrong, they go everywhere. On busy mornings, I’ll sometimes switch back to a spouted portafilter and accept a slightly worse shot for the sake of speed.
Knock Box
Totally optional. I went without one for a long time and just knocked pucks into the trash. That said, having one is a pleasant convenience—even if it’s one more thing to clean.
Puck Screen
A puck screen helps distribute water more evenly, reduces channeling, keeps the shower screen cleaner, and makes knock-outs tidier. It can noticeably tighten consistency—but it is another item to rinse after every shot.
WDT (Weiss Distribution Technique)
A WDT tool breaks up clumps and improves ground distribution. It’s most useful if your grinder produces noticable clumps. Prices range from $10–$100, but in my experience, returns diminish sharply after ~$30.
Leveler
Levelers help flatten the coffee bed before tamping. Some swear by them; others find them unnecessary when using WDT. Personally, I prefer WDT—it’s cheaper, simpler, and takes up less counter space.
Final Thoughts and Key Takeaway
If you want good espresso at home without turning it into a full-time hobby, the Bambino Plus is a fantastic choice.
Key Takeaways
- Prioritize your grinder—it matters more than the machine
- Start with the minimum required tools, then upgrade slowly
- Accessories can improve consistency, but none are magic
- This setup shines for speed, simplicity, and daily reliability
If you’re chasing absolute perfection or brewing for multiple people back-to-back, you may eventually outgrow it. But as an entry-level espresso setup that delivers real results with minimal friction, the Bambino Plus is hard to beat.
For guidance on a standized workflow for the Breville Bambino Plus, check out this article: My Exact Bambino Plus Espresso Workflow (Dose, Yield, Time)
Frequently Asked Questions
Q1: Is the Breville Bambino Plus good for beginners?
A: Yes. The Bambino Plus is beginner-friendly, with fast heat-up, consistent shots, and automated milk steaming, making it easy to get café-quality espresso without a complicated workflow.
Q2: What is the minimum equipment needed for a home espresso setup with the Bambino Plus?
A: At minimum, you need a capable grinder, a tamper, a scale, and a milk pitcher. Optional accessories like a bottomless portafilter, WDT tool, and puck screen can improve consistency but aren’t required.
Q3: Do I need a special grinder for the Bambino Plus?
A: Yes. A quality espresso grinder is crucial. Options include hand grinders for quiet, small-batch use, or automatic grinders like the Baratza Sette 270 for fast, precise, and consistent dosing.
Q4: Can the Bambino Plus make milk drinks easily?
A: Yes. Its automatic steam wand allows beginners to easily froth milk for lattes and cappuccinos, producing consistent microfoam without manual effort.
Q5: What optional upgrades improve the Bambino Plus espresso setup?
A: Useful upgrades include a dosing funnel, bottomless portafilter, puck screen, WDT tool, and knock box. These improve grind distribution, extraction feedback, and cleanup convenience, but none are mandatory for good espresso.
Q6: Is the Bambino Plus suitable for making multiple drinks quickly?
A: It works well for 1–2 drinks, but if you regularly brew for multiple people back-to-back, a larger prosumer machine may be more efficient.
Q7: Do I need a timer or scale for espresso with the Bambino Plus?
A: Yes. A scale is essential for consistent dosing, while a timer helps track shot length. Many modern scales include both features for convenience.